Welcome

You have reached the blog of Keith Elder. Thank you for visiting! Feel free to click the twitter icon to the right and follow me on twitter.

Getting Started with Home Automation

Posted by Keith Elder | Posted in Home Automation | Posted on 14-11-2017

Want just the products I use for home automation? Check out my home automation kit below.

The year 2017 will probably go down as the year home automation finally went mainstream. Each time I walk into our local Best Buy, numerous people are standing around the home automation section, and it keeps getting bigger and bigger. The first thing you will learn about home automation is there is a lot to learn, but, you can still have much fun upgrading your home. This past year I spent much time researching and updating our house to make our life easier. I started small, and every month I added something. If you are looking to get started in home automation, or maybe just a gift for that geeky family member this holiday season, this article will help you get started and give you some ideas.

Start With Your Network

Home automation does not work without having a vast home network. It all starts from there. Think of your home network as the foundation for home automation. You need one that will:

  • cover your entire home
  • allow for many devices to be connected
  • will enable you to grow and expand for the future

The best upgrade I did for my house this year is replaced my aging Asus WiFI router with a new type of wireless network called a “mesh network.” A mesh network auto configures and routes traffic as needed and can even select the best protocol for each device. Also, they are easily extendable. Need more space upstairs? Add a new mesh point.

amplifi hd mesh network

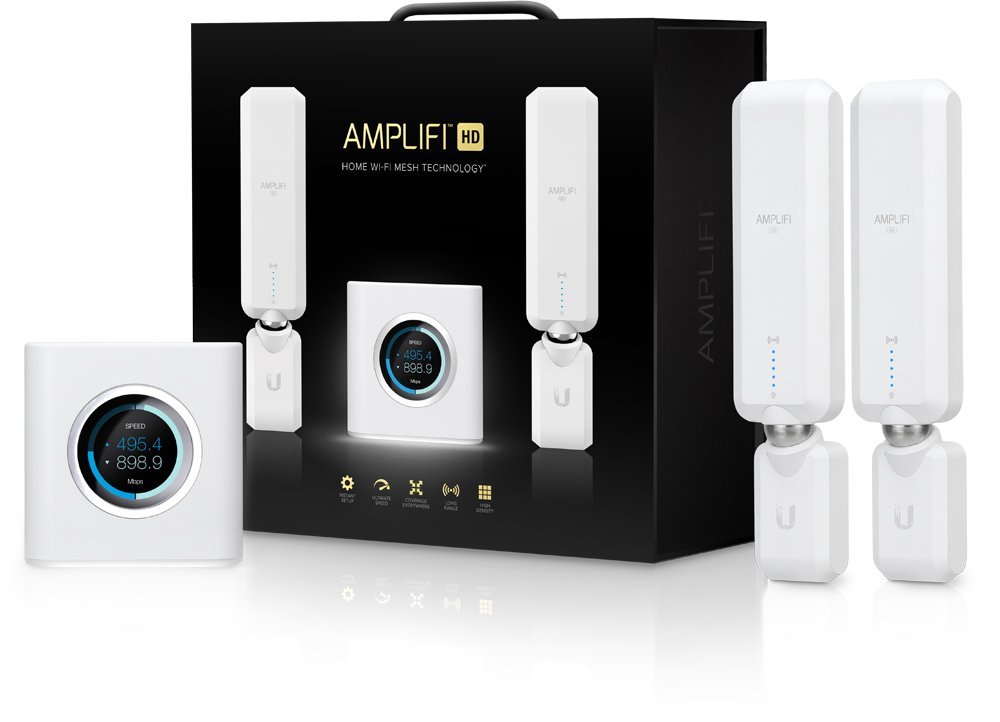
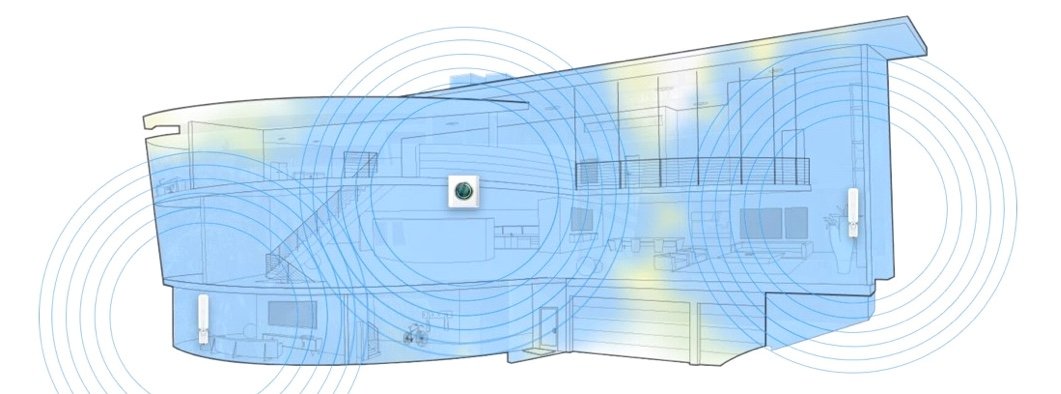
I went with the Amplifi HD (High Density) mesh router pictured above. It comes with the router (the white box) and two mesh points. The mesh points plug directly into the wall, and so they can be located throughout the home to give you the best coverage. Need more coverage? Buy more mesh points. Unless you have a substantial home, this out-of-the-box system will provide you excellent coverage. I even have full WiFI signal strength out to our mailbox. Here is a sample setup.

amplifihouse

While I highly recommend Amplifi’s system for ease of use and simple setup, there are others you might want to consider the Google Wifi or Netgear Orbi. These would be the top three choices I would recommend. However, I love Amplifi’s built-in LED screen directly on the router. Their phone app puts the power of your network right in your hands and allows you to monitor usage, turn devices off (go to bed kids!), port forward, and even schedule times devices can use the Internet.

Pick a Hub

Now that we have a good foundation to get started with home automation we need to learn about hubs. These devices control the components you have installed (door locks, garage door opener, etc.). My suggestion is to start with a hub first, then buy one or two add-ons and gradually grow over time.

Here is the downside to home automation: there isn’t a standard. Everyone is using different protocols. Let’s say you want to start simple with a light switch or replace your front door lock. The hub you choose needs to know how to control each component. This is where the hub comes in. To confuse matters even more, various manufacturers products only work with their hub like Phillip Hues, Lutron Caseta, etc.

NOTE: You can choose Apple’s HomeKit as the protocol you are going to use. You can just use your phone to control your devices, and there is no hub required. However, if you want to automate things really (turn the lights outside on at 7:00 PM) then you still need an Apple TV or iPad to configure and control everything,

There are three significant players today in the home automation space when it comes to hubs: Samsung SmartThings, WINK, and Logitech’s Harmony Hub. At some point, you are probably going to want to own two out of the three of these. Samsung’s SmartThings and WINK are essentially direct competitors to each other. Each supports different protocols and will control various components. Each has an app that runs on your phone that allows you to setup and controls your devices. The constant need to check if your hub even endorses a device is where home automation starts to get a little tricky. Ultimately, the hub you select determines the various accessories you can acquire. Today, there is no getting around that.

That leaves us with Logitech’s Harmony Hub. Bear with me as this may get a little confusing. A lot of the things that SmartThings and WINK can control, so can Harmony Hub. However, primarily the strength of the Harmony Hub is its ties to multimedia devices, which SmartThings nor WINK can control. If you have many multimedia devices, chances are over the years you might have owned a Logitech Harmony remote or seen them in the stores. Now your iPhone (as pictured below) can control your multimedia components as well as additional items.

HarmonyiPhone

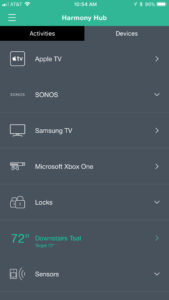
As you can see from above, my setup gives me one app to control lots of devices. It can even read the devices from SmartThings or WINK and offer them up in one interface as well. If you are starting out with home automation, my recommendation is to get the Logitech Harmony Hub. Logitech also offers an extender hub that supports ZigBee®, Z-Wave™, and Z-Wave Plus compatible devices with your existing Harmony Hub. This will open up more items. However, the extender hub is expensive. For the same money or even less you can get a SmartThings hub and open a whole new world of devices you can acquire.

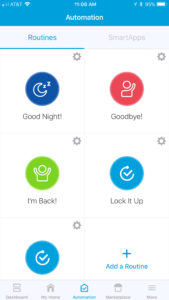
When it comes to actual home automation though, SmartThings and WINK offer a lot more in regards to customizing events. Thus, why I said earlier, you will probably want to own two out of the three hubs eventually. Here is a screenshot of the types of things you can do with SmartThings automation. Of the two, it is the most robust.

SmartThingsAutomation

Of course, you can leverage IFTTT (if this then that) with all three hubs. Things get cool when you start to leverage IFTTT. Imagine sending a text message, and your lights come on at home because you are leaving work late for example. The possibilities begin to become endless.

Confused yet? I know, this stuff can be when starting out. Let’s keep it simple though, get the Harmony Hub first because it can control more than just locks and sensors. It can control your home theater system as well. While not as robust at automating things as SmartThings or WINK, it is still a must-have in my book.

Door Locks, Switches, and Sensors

Once you have a hub picked out, it is time to purchase a few items for your home. I started with door locks and garage door opener. Mainly so I could let some friends in the house while I was out of town. Maybe you want to turn the lights on while you are away for security purposes. No matter the case, pick something easy you can install yourself that will add some immediate value.

Door Locks

kwikset910

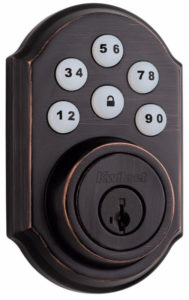
For door locks, I chose the Kwikset 910 Z-Wave that was compatible with my SmartThings hub. It supports “Smart Key” technology which allows one to quickly re-key the lock with any Kwikset key. No need to call a locksmith ever again if you want to change the locks on your home. There are others available by Schlage and Yale. All of them are easy to install and configure, and even integrate with devices like Amazon Echo which we will cover later.

Switches or Light Bulbs

lutron

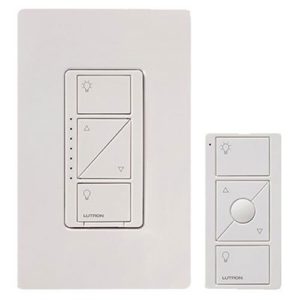
Before you go out and buy the Phillip Hues light bulbs, please allow me to stop you before you head out the door. The absolute quickest and easiest thing to do is buy the Phillips light bulbs. However, don’t, unless you live in an apartment. They are a hack in my opinion and here’s why. If you put a Phillips Hue light bulb in your house and someone turns the switch off at the wall, guess what? You cannot turn the light back on. It defeats the whole purpose. Instead, replace your switches on the wall. Then you can control any light bulb or device connected to the switch and use any light bulbs you find on sale.

The leader in switches, which also comes in a variety of colors to match your home, is Lutron Caseta. Lutron also sells blinds that will raise and lower. As we start to add things on, our automation can begin to get a little more sophisticated. Automation can be created like “Movie Night” which automatically lock all the doors and turn off the lights.

Sensors

There are multiple sensors to consider. Motion is probably one of the first ones most people think of when it comes to security. However, there are lots more these days. They include:

  • motion sensors
  • water sensors (great for water heaters)
  • power sensors
  • multipurpose sensors (doors, windows)
  • weather stations
  • soil moisture sensors (know when to water your flowers or get an alert)

Of all the components, these are probably the cheapest if you are getting started on a budget. However, they are also some of the most useful when combined with automation in SmartThings or IFTTT. For example, have you ever done laundry and left the clothes in the washer or dryer? A power sensor can remind you the clothes in the machine are done and now need to go to the dryer.

Alternatively, imagine you put a motion sensor in your bedroom. If you get up between the hours of midnight and 6:00 AM you can set your lights to automatically raise up 10% to light the way to the bathroom and then automatically turn off after you leave.

Voice Control

Echo

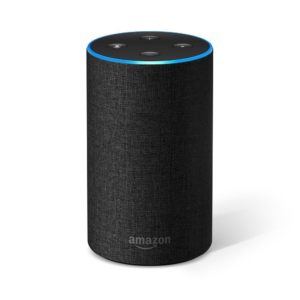
I have mentioned Amazon’s Echo “Alexa” earlier. The Echo is a device that has a speaker and gets its commands through voice interaction. I cannot even begin to cover all the things an Echo can do, but, when added to your home network, it can interact and control your smart home devices. It can also put things on your calendar, remember grocery items, and even set timers and alarms.

Some people are worried about privacy but I for one love the convenience factor the Echo provides. “Alexa, watch TV,” “Alexa, play XBox,” “Alexa, turn off Xbox” are just a few examples that are within your reach with a Logitech Harmony Hub and an Amazon Echo.

Of course, there are other manufacturers like Google who are investing in the same technology. There are differences in the things each can do. In my experience, Google’s devices are smarter at random questions, but Amazon’s is more connected. Meaning I find the Echo to work with just about everything. Even Apple has entered the market with their HomePod. Echo’s start as low as $49 and there are always deals on them (buy three get one free) so it makes it easy to get started.

Cameras (Indoor and Outdoor) and Security

Security is a big concern with many, and we see many options in 2017. Wireless and cloud-based cameras are all the rage and to be honest none of them are perfect. They either cost too much to start with, cost too much monthly, or just don’t have all the features everyone wants. Here are a few options:

If you thought hubs were confusing, they are nothing compared to the endless options when it comes to cameras. Not only do you have to buy the hardware but then you have to figure out the cost of all the different plans. If you are serious about security, call a professional and have them install a fully monitored security system. There is no replacement today that I’d thoroughly trust other than a professionally installed system.

If you are a do-it-yourselfer, then I would recommend the Arlo system. It is entirely wireless but offers a base station where a hard drive can store data locally. Their cameras are fully wireless and can be mounted anywhere. Just be aware there have been issues with the motion sensors on the Arlo’s capturing video at crucial times. Again, nothing beats a professionally installed outdoor system.

AmazonShow

However, for indoor uses, these cameras add much value to your home. Have a newborn? Then look into getting an Amazon Show and combine it with either the Logitech Circle 2.0 or Amazon’s cloud-based camera mentioned earlier. You will have an instant baby monitor and can drop in anytime to listen in, or just watch from the living room while the baby sleeps. Alternatively, maybe your newborn is that new puppy. Either way, you will be covered.

Other Items

But wait, there’s more. We have not even talked about thermostats, sprinklers and garage door openers. I saved these to last because there are fewer choices in each category. Here are some recommendations.

Thermostats

Lyric

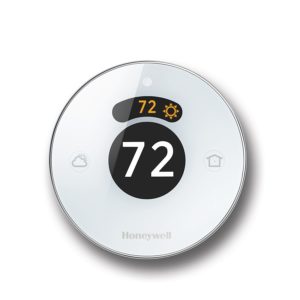
If you have ever gotten up out of bed during the middle of the night to adjust the thermostat due to the weather changing, you may want to put this item higher up on your list. They have gotten pretty smart with geo-fence location (that means they know when you are at home or away) and can ultimately save you money in the long run. Also, they support auto temperatures where you can set it and forget about it.

As of right now, there are two I would recommend: the Nest and the Lyric by Honeywell. Both look great on the wall and have similar features. I chose the Lyric because of the SmartThings hub and Harmony hub integration. There are plenty of YouTube videos comparing the two. Just remember it needs to integrate and play nicely with other things.

Sprinklers

Rachio
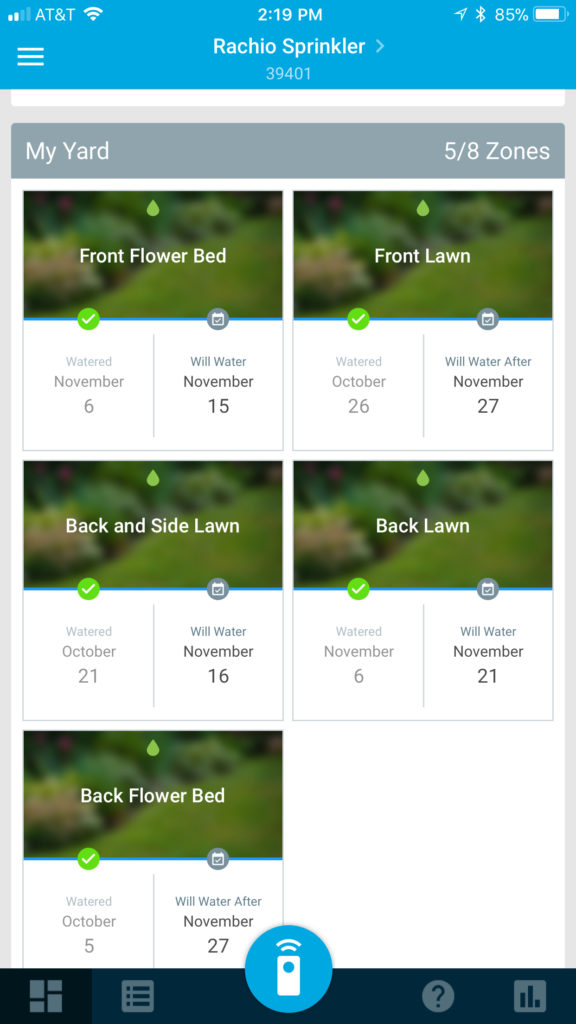
I will be honest; sprinklers scare me. They just pop out of the ground at random and squirt water and then disappear. It is like they never existed. So weird.

This past summer, after much research, I installed Rachio’s eight-zone sprinkler controller. Of all the upgrades I have done, this one has saved me the most money. Rachio has some pretty impressive algorithms that automatically calculate when to water your yard based on the type of soil, incline, and the nearby weather station you have entered. Of course, if you have a personal weather station things get even more accurate.

Remember the days of having to turn off the sprinkler when it rained? Gone. Worried about over watering your yard? Gone.

Within the first few months of owning Rachio’s controller it paid for itself in all the water, it did not use due to all of the rain we had. It took about 20 minutes to install on the wall and then another hour of measuring the zones in the yard and testing everything out.

Recently I was out of town and had a sprinkler head replaced. My yard guy texted me and asked me to turn the sprinklers on so he could find it (see, I told you they were scary) and replace it. I was over 2,000 miles away and opened the app and turned on the front yard. A few minutes later he texted back all set.

Garage Door Opener

There is nothing magical about garage door openers, and there aren’t that many choices. However, when you are away and need to get someone into your garage, they are a must-have. I have a Linear GoControl. You will have to look up your unit and then investigate which one it supports based on the hub you have chosen.

Most of them work by attaching a sensor to the door that has a gyroscope in it. As the garage door moves, one way it is closed, the other way it is open. You can combine a sensor from SmartThings (if that is the hub you have chosen) and place it in your car. When the vehicle shows up the garage door opens, when it leaves, the garage door closes. Personally, I find this a new level of lazy, I mean, how hard is it to push a button in your car? But hey, let’s automate all the things.

Wireless Speakers

Sonos2

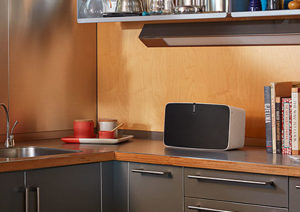
Last, but not least are a new breed of speakers called wireless speakers. Of everything in automating your home, these high fidelity creatures are the most expensive by far. One speaker can cost as much as $700. However, just like everything else, start small. Buy one, then another, then another.

Sonos and Bose are the two top manufacturers in this space today led primarily by Sonos. The way they work is you buy a speaker and put it into a room. Then buy another speaker and put it in another place. Then you can connect your living room and all the other rooms in your house to play the same song at the same time. Great for party tricks for sure. They sound amazing and work with pretty much any and every type of music you want from Pandora, Spotify to Apple Music. Did I mention they sound amazing?

Sonos1

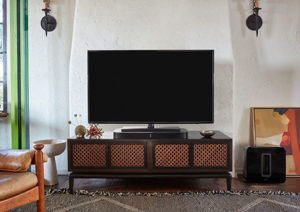
However, they also work as a home theater. The Playbar by Sonos goes in front of your TV and connects to the optical cable coming out of the TV. That is it, one wire. You join the rest of your speakers it to your WiFI network using the Sonos app and the speakers you have selected all sync and play whatever is coming out of your TV. Whether it connects to an Apple TV, Roku, Firestick, Cable, XBox, or PlayStation. You can start with just one speaker, the Playbar, and then expand to 5.1 theater sound as you go by adding a sub and then surround speakers. Did I mention they sound amazing?

But I have speakers, why do I need these again? Here is the upside. Remember those colossal home theater receivers by manufacturers like Denon and Onkyo? Wires running everywhere? Well, they are not needed now. As long as you have a power outlet, you can set a speaker there now (no more wires). Of all the devices I have added I use these the most. Working at home I’m streaming Spotify to the speakers from my Mac. Phone rings, pause the music, answer, hang up, resume playing.

To add the home automation piece with our speakers, we leverage our Harmony Hub along with a Harmony Remote combined with the Amazon Echo. The Harmony Hub can control all of your multimedia devices as mentioned earlier and even run something called “Activities.” Activities are how you control what happens when you want to play Xbox for example. They carry out the steps needed to play Xbox: turn the tv on, set TV to the HDMI 2 port, turn on Sonos speakers, and turn on XBox. Now it just takes a voice command, “Alexa, play Xbox.”

As you add more things to your home, more automation scenarios become a reality. New scenes become possible once you have installed wall switches, blinds, a garage door opener, and door locks,

“Alexa, movie night.”

All of your multimedia devices turn on, the blinds lower, the garage door closes, the lights dim, and all of your doors lock.

Speaking a command like that and having magic happen sounds like science fiction I am sure. It is not that hard though.

So start small, and by this time next year, you will stop worrying about watering your yard, turning off lights when you go to bed and even touching a remote. They are so 2016.

KeithHeadShotSpeakingRoundKeith is the Sr. Technology Evangelist for Quicken Loans, Inc, the nation’s largest online mortgage lender, winner of eight JD Power Awards for client satisfaction. You can follow Keith on Twitter at @keithelder. Looking for a home loan or to refi? Visit Rocket Mortgage and shop with confidence, get approved in as little as 9 minutes. 

For Sale – Cape Horn 31XS Center Console OffShore Boat Twin Yamaha 300’s with Warranty until Feb 2018

Posted by Keith Elder | Posted in Boating, For Sale, Man Toys | Posted on 19-10-2016

NOTE: Boat is Sold

Updates:

  • Oct 24th – added new video at the bottom of full walk around of hull and motors
  • Nov 1st – boat is under contract, sale is pending
  • Nov 4th – boat sold

COMFORT AND CONVENIENCE

This is my personal boat and I am the second owner. You will not find a cleaner, better rigged 2013 boat that has all the comfort and convenience as this Cape Horn 31XS. The Cape Horn 31xs is built on the tournament proven hull, but designed to add comfort and convenience for you and the people you enjoy the most. One of the driest rides out there in its size.

The boat is fully loaded from top to bottom with a lot of electronics and safety gear, much of it new within the last year. The boat has not been tournament fished nor used commercially as a charter.  The boat has primarily been used for boating to the islands, cruising the bay, cruising to get a bite to eat on the water. Occassionally when the weather is perfect and I’m not traveling we’ll head out to some rigs or reefs to fish.

Here is a shot of us anchored at Horn Island, one of the many barrier islands off of the Mississippi gulf coast.16.JPG

Motors

The boat is powered by twin Yamaha 300 outboards. These are bullet proof motors known to last over 10,000 hours. These motors have 920 hours on them with the majority of those hours at idle (we do a lot of idling while at the islands or fishing around reefs or rigs). If you aren’t that familiar with boat hours it is roughly equivalent to about 33k miles on a car, which as you know is not a lot. The motors have been flushed after every use and have been professionally maintained by Seven C’s Marine in Biloxi, MS. They are also in warranty until Feb 2018!

17.jpg

Fuel Burn / Cruise / Speed

This 2013 Cape Horn 31XS holds 290 gallons (two 145 gallon tanks) of fuel. An interesting piece of info is after 2013 this model only holds 273 gallons because Cape Horn had to rework the fuel tanks because of new regulations. So if you are looking at current specs they do not match this year/model.

With 290 gallons of fuel the boat has a tremendous range of around 500 miles. This gives you plenty of reach for long cruises or offshore fishing.

Top speed on the boat (that i’ve seen) is 58.6mph. Typical cruise is 40-42mph burning 1.8mpg of fuel. You can dial the boat in to get 2.0mpg if you want to slow cruise around 30. Here are some numbers that I’ve documented (I have photos to back this up):

  • 32.2mph at 1.9mpg
  • 44.7mph at 1.6mpg
  • 50.8mpg at 1.2mpg

Care

The boat has been dry stored all of its life (previous owner kept it dry stored as well) and is super clean and well taken care of. The boat is not bottom painted nor been left to sit weeks in the water. The boat gets a full wash down after taken out of the water from top to bottom. In June of 2016 the boat was fully detailed and will be delivered fully detailed and ready for the next owner.

The boat is dry racked at the marina and is not exposed to the elements. As you see in this video it is also stored with all the hatches left open to cut down on mildew building up in the storage compartments. A trick I learned many years ago. This short video will also allow you to see the full lines of the boat.

Trailer

It comes with a Magic Tilt tandem trailer, 7500lb tandem axles. Since I’ve had the boat I’ve only trailered it a few times. In September of 2015 I had the whole trailer serviced including lights and the hubs. It is ready for a cross country journey or to the nearest boat ramp.

18.jpg

I created a short walk through video of the trailer. I apologize in advanced that I didn’t pull it out of its current location, but it just goes to show how little it is used. About the only time it is moved is to mow around it, which I haven’t done since the early Spring. The trailer measures 40ft long and 8ft 10inches wide. IT IS HUGE!

31XS – EXTRA STORAGE and SEATING

With the same great ride as the legendary 31T, the 31XS has truly redefined offshore comfort. The XS adds more storage and seating while preserving the unsinkable characteristics of the Cape Horn line. Large compartments were added to the XS model front gun whales for all your gear. Removeable front cushions which snap in place allow easy access to the bow of the boat. When fishing they are easily removed. The seat in front of console also doubles as a cooler and there is seating on the 60 gallon live well on the leaning post and also a transom seat.

While cruising you can easily sit 10 people on the boat. When you want to fish, remove the cushions and you have a fantastic fishing platform to cast that also provides super easy access to the bow when anchoring or sight casting on calm days.

20150602_161732 (1).jpg

Features

  • ADVANCED HULL DESIGN
  • UNSINKABLE
  • LENGTH 31′ 8″
  • BEAM 9′ 1″
  • DRAFT 22″
  • DEADRISE 23 DEGREES
  • WEIGHT 5300lbs
  • MAX H.P. 700
  • FUEL CAPACITY 290 GALLONS
  • MAXIMUM LOAD 4000LBS
  • 10 YEAR HULL WARRANTY
  • LIFETIME TRANSOM WARRANTY
  • ALUM TRAILER WITH DISC BRAKES (ALL AXLES), ALUM MAG WHEELS WITH RADIAL TIRES
  • HARD TOP WITH ELECTRONICS BOX
  • FORWARD SEATING
  • REAR TRANSOM SEATING
  • (2) SPREADER LIGHTS
  • LEANING POST WITH BACKREST
  • ELECTRIC TRIM TABS WITH INDICATORS
  • S.S. SWIM LADDER
  • 1000 GPH BILGE PUMP
  • 1250 GPH AUTO BILGE PUMP
  • COAMING BOLSTERS
  • TILT WHEEL HYD. STEERING
  • VACU FLUSH TOILET WITH HOLDING TANK
    • a $2500 addon
  • FLUSH MOUNT HARDWARE
  • RAW WATER WASHDOWN
  • FRESHWATER SYSTEM (20 GALLONS)
  • 7’ (700 QUARTS) INSULATED FISH BOX,
  • 85 QT. INSULATED DRINK COOLER
  • WALK-IN CONSOLE
  • LIVEWELL SYSTEM (60/26 GALLONS)
  • FLUSH MOUNT ELECTRONICS AREA (13 X 40)
  • ROD HOLDERS (26)
    • (2) deep drop added June 2016
  • 9 STAINLESS CUP HOLDERS
    • (4) added to rear gunnels June 2016

Electronics and Accessories

  • Auto Pilot
    • Garmin GHP 20 Autopilot (New Oct 2016!)
  • Radar
    • Garmin 24HD Radar
  • Sonar
    • Garmin GSD24
    • Airmar 1k transducer
  • Stereo
    • Clarion Radio (supports iphone, has iphone jack)
    • Fusion BT100 bluetooth
  • Amps (1600 watts total)
    • 1000 watt JL Audio AMP
    • 600 watt JL Audio AMP
  • Speakers
    • (4) 10″ JL Audio subs (2 new Sept 2015, 2 new April 2016)
    • (6) JL Audio speakers
  • (2) Head Units
    • 7212 Garmin
    • 5212 Garmin
  • Satellite weather
  • Tackle storage
    • Yes, in leaning post on port side
    • Holds 4 plano boxes and has one large pull out drawer
  • Helm Cushion (to help knees and back while underway)
    • Yes, Foot cush
  • Underwater LED lighting
  • Trim tabs
    • Lenco trim tabs
  • Batteries and switches
    • (4) batteries total
    • (3) perko switches
    • One battery per motor, (2) for the house
    • Also has isolator, can run either motor to keep house batteries charged
  • Outriggers
    • Yes, Revolution outriggers
  • EPIRB
    • Yes, ACR (new Sept 2015)
  • Anchor and rode included

Additional Pictures

There are other pictures available for viewing online. You can get some higher resolutions by visiting that link.

Walk Through Video

Sometimes it is hard to get a feel for things in pictures so I created a full length walk through video of the boat. In this video I walk you through all the many features of the boat and point out any flaws. Hang in there, I got a little long winded but it should give you a complete feel for the care I’ve put into the boat and how it is rigged.

Outside Hull / Motor Walk Through Video

I was at the marina and had the boat on the maintenance rack a few days ago cleaning some of my gear out of the boat and doing a wash down. Took a full walk around video of the outside hull and motors. I apologize for the wind, it was blowing 30 knots at times. Anyway, enjoy the video!

Why am I selling the boat?

I get this question a lot so I thought I’d post it here. Good question, and fair. The short answer is I’m moving up to a larger boat. This boat will fish 5 comfortably and you can stretch it to 6 depending on the size of those going. I have to leave family and or friends on the dock many trips, just can’t fit everyone so I’m going to move up to a bigger boat. I don’t know what I’ll be looking at for the next purchase but I’m looking forward to shopping and doing some research. If it honestly wasn’t for that I’d be keeping this boat. It is a dry ride, great economy, is fast when you need it, has tons of range, built like a tank and unsinkable, is loaded to the gills with bells and whistles and is comfortable for both fishing and cruising. I really love the boat. My favorite boat of all time and if my circumstances change in the future I wouldn’t hesitate to own another one.

Price: $124,999 – Call or text 601.467.9744

Erlang – Hot Code Loading on Nodes For Dummies

Posted by Keith Elder | Posted in Erlang, XBOX 360 | Posted on 20-02-2014

Erlang – Hot Code Loading on Nodes For Dummies

Hot code loading across nodes in Erlang is a fantastic feature. After hearing about this feature it peaked my interest early on about Erlang and got me to dig in more.  But, I couldn’t get it to work because of my newbyness to Erlang! Hopefully this blog post will help others. 

Imagine You Are a .NET Windows Service

To understand how hot code loading in Erlang works let’s picture for a moment a Console application or Windows Service or Web Service deployed to three different machines. As an Engineer we need to do a simple fix and redeploy code. What do we have to do? Well we have to make our change locally then build the solution, run unit tests, etc. Now it is time to deploy our simple change. This is where things start diverging fast between Erlang and other technologies.  In .NET/Java we have to copy the entire library to each server and then cycle through stopping and starting each process on each server so the new code will get picked up. Whether this is Java or .NET doesn’t matter the same thing applies. Even if your language of choice is a dynamic language like PHP/Ruby/Python you still have to copy the file you changed to all servers. The server or process doesn’t have to be restarted in dynamic languages but you still have to copy the file(s) to the various servers either way. In Erlang we can simply connect to a node and then network load the new code across all nodes in the cluster! 

See this is the big difference. Erlang is distributed out of the box. It was built to be distributable and continue running, even during code pushes. Erlang was designed with the purpose in mind that a system had to keep running. Think about it for a second. What if the phone company said you couldn’t make a call between 9:00 PM and 1:00 PM on a Saturday night because of maintenance window? Yeah that wouldn’t go over very well. There are numerous reports of uptime in systems written in Erlang. Many fans of Erlang use the terms of 9 9’s (and there is even a company called Nine Nines) which his 99.9999999% uptime. If you do the math that is about 30 milliseconds of downtime a year. What? Yeah. That. 

Here’s a quick walk through on how to do this. I tried several times to get it to work and kept running into errors and getting errors so I’ll cover them so you won’t have to struggle at first as much as I did. Here we go.

Install Erlang 

I assume you wear big boy pants and know how to install software but here are a few quick ways to get Erlang installed and up and running. 
  • Mac – use brew and “brew install erlang”
  • Windows – Download Erlang from Erlang.Org
  • Debian Linux – sudo apt-get install erlang
  • CentOs Linux – sudo yum install erlang

Open a terminal / cmd prompt window after it is installed and type “erl”.

If you’ve gotten this far, good, you have Erlang installed. By the way to exit type “ctrl-g” and then “q” (for quit). 

Now let’s write a simple program that will add two numbers. 

Our Program – demo.erl

-module(demo).

-export([add/2]).

add(A, B) ->
   A + B.
Copy the above code into a file named demo.erl. Note: it has to be named demo.erl because the first line declares the module name as demo. This is based on a convention as the name of the module and file have to match. 
While Erlang is a dynamic language it is still compiled. To compile this from the cmd line type: “erlc demo.erl”. If there are no errors the command prompt should just return. If there are errors they will print to the screen. If you are typing by hand be sure each line ends with a dot (period). 
The above file isn’t magical, it simply adds to numbers. For those coming from a .NET/OOP background think of the export line as making the function add public. Since Erlang is a functional language there are no classes! This is a good thing as Erlang programs are a lot smaller than languages such as C++/.NET/Java. 

Setting Up Our Nodes

Because Erlang is distributed we can create multiple nodes and run our module demo across three nodes. Typically you’ll do this on completely different servers but because Erlang runs within a VM we can start three instances of the VM locally, connect them, and we have a distributed program. To do this open three terminal windows or command prompts. I’m using a Mac so I will be using tmux in iTerm2 for these examples. 
NOTE: BE SURE WHEN YOU RUN THE FOLLOWING COMMANDS YOUR demo.erl FILE IS IN THE DIRECTORY FOR THE FIRST NODE YOU START!
If you want to follow along with my screen shots be sure to install tmux (brew install tmux). I’ve created three cmd prompts inside of tmux and each one I’m going to run the following command to start an Erlang instance in each one:

erl -name {flintstonecharacter}@127.0.0.1 -setcookie dino

As you type each one in your command prompt change the name of the flint stone character. I’m using the following: fred (node1), bambam (node2), betty (node3). After doing so you should have three Erlang prompts that look like this if you are using tmux. 

So what did we just do? Well the -name gives each instance their name of course. The -setcookie option is super important as this is what really connects all three Erlang VM’s together. That cookie has to be named the same.

Running Our Code
Now that we have al three started let’s load our demo program into the top one and run it. 
To do that we are going to type the following:

c(demo). 

The result of running that command should be: {ok,demo}. That means our code was compiled. Again be sure the demo.erl is in the folder of the first Erlang shell when you launch it. To run it simply type:

demo:add(34,34343).

Press enter and you’ll get back those numbers added together. 
So far our other two instances know nothing about our demo module. But let’s clue them in so they can run it too! To do this we are going to ping the nodes so all three are communicating. In your first Erlang shell type: nodes(). This should return [] which means there are no other known nodes. Let’s add them though.
To do this we are going to type the following into the first instance (fred):

net_adm:ping(‘bambam@127.0.0.1’).
net_adm:ping(‘betty@127.0.0.1’).

Now type nodes(). and you should get back a list containing both bambam and betty. 

At this point all three are connected. We can now hot load some code for them all to run. Let’s push our demo.erl program to all of the nodes (this works if you have 3 or 30). To do this we are going to use the function nl() which means network load. Run this command in your node1 instance (mine is fred). 

Notice we get back “abcast”. Now we can go to the other nodes and run demo:add(4,5). and it works! We just hot loaded code to all the nodes in our cluster. 
If you aren’t sitting back in your chair right now scratching your head going *holy cow* you should be. This is amazing. Take it from me. To do this in other technologies would be mountains and mountains of work. Trust me, I’ve done it. 
In the case above we basically deployed new code to new instances. What if we want to change it will it is running? Basically the same thing is just as simple. Edit the demo.erl file and add the following line above the A + B. line. 

io:format(“Calculating like a boss!\n”).

This is the equivalent of doing “Console.WriteLine()” for those .NET folks. We can test this out on our first node by running c(demo). again. Run demo:add(1,2). in the shell and you should get something like this:


Great it worked. Now let’s push our change to all our nodes! Simple. Just re-run nl(demo). and then re-run a calculation on each node. Boom! Hot code loading. 

Hopefully this little walkthrough will give you some encouragement to look into Erlang. I left out a lot of details about how things worked intentionally as if I didn’t the article would be just too long. Thank for reading and more Erlang articles to come. 

Back in Mac, I typed in Bash

Posted by Keith Elder | Posted in Apple | Posted on 15-02-2014

Tags:

I was trying to think of a title for this post and the first lines to “Back in Black” by AC/DC kept popping in my head. I was going to try to write a witty pun or play on words on the lyrics to “Back in Black” but I couldn’t think of a word to rhyme with *ash for the second verse. However, the lyrics are somewhat fitting.

Back in black I hit the sack

I been too long I’m glad to be back

Yes I am

Let loose from the noose

That’s kept me hanging about

I keep looking at the sky cause it’s gettin’ me high

Forget the hearse cause I’ll never die

I got nine lives cat’s eyes

Using every one of them and runnin’ wild

Cause I’m back

What am I trying to say you wonder? Well, last week I switched back to using the forbidden fruit, a half-eaten fruit if you will, Apple. The sky isn’t falling for those that only know me as a long time Windows user and Microsoft MVP because I’ve owned a Mac since 2002. I’m not going to suddenly start writing IOS apps and get all hipster so don’t worry. I’m still going to be heavily involved in the .NET community so this isn’t a “I’m leaving .NET for {insert technology} post” because the last time I checked there are still millions and millions of Windows PCs that need software. It is just that I firmly believe a Mac (being Unix based) opens the polyglot programming language door more so than running a Windows PC. Let’s face it, most of the technologies being developed aren’t being built on Windows. They are mostly being built on Mac or Linux and run very consistent on both of those platforms with just a recompile. If you’ve ever tried to run PHP, Python, Ruby, Node etc on Windows you know what I’m talking about. These technologies aren’t native and while Microsoft has made some great strides (especially with Node in Azure recently) they don’t feel or act *native* and that’s important.

2014 is about a different journey for our team. It is a journey that I have been pondering since last fall and that is how to build fault tolerant highly distributable concurrent high availability systems. While .NET, Node, Java, PHP, Python, Ruby are all great I have a burning necessity to build a highly concurrent highly available distributable system (system being the keyword). After a lot of research, thought, discussions, reading, and playing all roads led us to look at Erlang. It isn’t a flashily super hot technology like Node but it is a super powerful platform to build robust systems with as other companies like Huffington Post, WhatsApp, Facebook, Heroku, and Zynga have figured out. 

I work with some amazing team members. Their open mindset and willingness to learn new things to solve our challenging problems in new and unique ways is what really makes this shift possible. As a matter of fact the whole team got Macs this week. While our team has always considered ourselves polyglots and prided ourselves on solving the right problem with the right tool we’re ramping up our polyglotness to DefCon 1 this year. 

Where this new journey leads I don’t know but I have a vision and a plan. It could be a bust or a genius move, time will tell. We’ll figure out the how as we go and I’ll gladly share the ups and downs with those that read this blog in the coming days, weeks, months. I hope to blog about what led us to this decision over time to look at Erlang in a very serious manner but in the mean time I challenge you to get uncomfortable and crazy with us and Learn You Some Erlang for Great Good

NYC Code Camp Saturday / MIGANG Wednesday

Posted by Keith Elder | Posted in .Net, Asp.Net, C#, Presentations, SignalR, Speaking | Posted on 13-09-2013

NYC Code Camp Saturday 9/13/2013 – Simplicity Is Genius

Saturday I will be attending my first New York City Code Camp (@codecampnyc ). I’m traveling thousands of miles to help you make you a better you. I’ll be doing the talk “Simplicity Is Genius”. Looking at the list of sessions this is the ONLY real Soft Skills session on the menu so I really encourage the New York faithful to attend. If you don’t come you are doing yourself a disservice. Putting technical content in the brain is great but you need to work on YOU some as well.

In this session we’ll take a break from code and focus on the other skills developers need called Soft Skills. We’re going to go deep on what "Simplicity is Genius" really means from the eyes of Forrest Gump and look at many of the life lessons Forrest was trying to teach us in the movie. After attending this session you will learn the value of providing value, how to better communicate with team members, the importance of being nice, and how to leverage techniques used successfully by salesmen backed by scientific research so you can ultimately… tell IT like Forrest Gump.

MIGANG Wednesday 9/18/2013 – Web Applications Re-Imagined for Today’s Demanding End Users

After CodeCampNYC I’ll be heading to Detroit to work onsite for the week. The timing works out so I can make the MIGANG on Wednesday night. I’m really looking forward to it and stressing at the same time as I’m giving a brand new talk entitled “Web Applications Re-Imagined for Today’s Demanding End Users”. If I can pull everything off I want this should be fun, enlightening, dangerous, scary, exhilarating all at the same time.

In this talk we are going to take an extreme departure from a typical three-tiered web application and look at how we can leverage asynchronous messaging, queues, and events in exciting ways.  We’ll be architecting a web application utilizing SignalR, TopShelf, Asp.Net, RabbitMQ, and ServiceStack to create a scalable, highly available, buzzword filled, real-time web application.  We’re going to look at how we’ll handle long running business processes that cross service boundaries using command queues and events to push notifications back to our end users. We’ll learn that we’ve actually made our application stronger, faster, and simpler to write (even transactional when we need it). In the end we’re going to try to break our application to find out if it is truly Engineered to Amaze.

If you are in the area I hope to see you at either event, don’t forget to say hi!